
Project Cultivation Process
For this project, I grew Persicaria tinctoria (common name Japanese Indigo) of both pink and white flowering varieties from seed saved from the previous year’s indigo plants. My original seed stock was through Strictly Medicinal Seeds, Grand Prismatic Seeds, a seed exchange in a private Facebook group for indigo growers, and two plants obtained from the Wylde Center in Decatur, GA. After 3 years of selective seed saving and cultivation, the resulting plants are still Persicaria tinctoria, but the specific variety is my own. Much like varieties grown in Tokushima are uniquely suited to their environment after generations of selective seed saving from the healthiest plants, the selective seed saving I have done in the last few years has resulted in plants that are far better suited to the microclimate of my own garden space than any of the plants from my initial seed and plant sourcing.
The seeds were started in soil blocks indoors in early March. In the climate in which this project was conducted, this was far too early to direct seed or transplant the seedlings. Each one was potted up after growing its first set of true leaves, then transplanted at the end of April. The plants were given a few days to recover from the transplanting process, then each one was pinched, leaving at least 4 inches of stem and a set of true leaves. The cuttings were then divided into 3-5 inch sections in cases where branching had already begun, or left whole when the plants were smaller at the time of pinching. Cuttings were places in water to root, which they did within a week, then transplanted into the garden to further expand the indigo planting.
I repeated the process four times through the season, each time the majority of the indigo plants passed a foot in height. This ultimately resulted in my being able to expand an initial 250 plants to cover just under 1 acre by the end of the season, as well as two 3’x8’ raised beds where I transplanted rooted cuttings from my most vigorous plants for seed saving purposes. This was important because I had reason to believe that fermenting insufficient amounts of indigo leaf had been the primary cause of failure in previous sukumo experiments.
The indigo planting for this experiment was placed in a clearing within a valley that is also a spring basin. This space receives 8+ hours of full sun each day, plus a few additional hours of dappled sun during the height of summer. This was an attempt to mimic the conditions in which indigo plants are grown in Tokushima, where low lying areas that maintain a notable amount of moisture throughout the growing season are the preferred locations for indigo cultivation.1 Plants were also irrigated during extended periods of no rainfall, with an inch of dry soil at the surface used as an indicator of when that irrigation was needed. While Tokushima averages multiple days of rainfall each week during the growing season, my location in western Georgia lacks that consistency.2 I began by irrigating by hand, but as the indigo field grew and I continued to tend it primarily alone, I switched to using an overhead sprinkler as needed because it became physically impossible to carry and distribute that much water before the sun was out enough to evaporate the water before it could soak into the soil.
The location I chose for indigo cultivation has previously been used as pasture for pigs. The pig manure has been allowed to break down undisturbed for 3-6 months, depending on which section of the field, before planting. This lightly aged manure was largely turned under into the soil during the transplanting process, but the soil was not otherwise amended.
Once the available indigo was fully planted, I cut a harvest in mid-August to prevent premature flowering. That harvest was used for other indigo projects. I took my final cutting starting in the last week of September and extending into October. The harvest process was more demanding than expected at this scale. I began by harvesting only leaves, but ultimately fell back to harvesting by cutting the full plan off the lower stem a few inches above the soil. While this meant I would later need to separate the dry leaves from the stems, I found that trade off necessary in order to successfully get it all harvested. I had no intention of having this project become a full time job, but at the peak of harvest time getting everything cut before it went to flower or froze largely took over my life for the last two weeks. I had hoped that the process of cutting, propagating, and transplanting over an extended period of time would act as a type of succession planting resulting in a longer window for harvest, but it did not. I was ultimately able to harvest 112 pounds of Persicaria tinctoria leaves before the first frost ended my opportunity to harvest more.
Project Sukumo Process
Drying the leaves was the first hurdle I needed to get over to create sukumo. The first harvests of leaves were simple. I laid them out directly on the concrete under my deck, which mimicked the spaces I had seen Awa region sukumo fermenters use. The spaces I had seen in images of older sukumo making operations appeared to be stone or wood floors in covered, but not enclosed fully spaces. I found this encouraged abundant air flow, while keeping the rain off of the drying leaves, but also limiting how much the plant matter was able to fly away in the moments that a gust of wind hit the space just right. I found that I did risk losing a notable amount of my harvest if I left it out after it got very dry and light weight, as even light breezes were able to move the pile as that stage.
As the harvest drug on, I ran into an issue with backlog. Each batch took 2-3 days to dry, depending on the weather. I could only dry as much as I could lay out in a fairly thin layer at one time. This layer needed to be moved around and turned with a broom multiple times each day to get even drying, which I struggled to balance with the time demands of continuing to harvest at the same time. I briefly attempted to hang some of the plants to dry in order to do more at one time, but this turned out to be very inefficient use of space. I laid some on screens and stacked them, but that dried unevenly and I didn’t have anywhere near enough screens to hold all of it. Ultimately, I had to beg a favor of a neighbor and expand my thin layer on the floor approach to drying into a mostly unused storage barn.
Once I had dried my harvest and collected it back into one place, I needed to remove the stems. In previous attempts at making sukumo, I had attempted a sort of reverse winnowing that was not very effective and resulted in a notable amount of leaves being lost to completely blowing away from the area in which I was trying to keep them collected. For this attempt, I picked up any stems I spotted and rolled the plants between my hands, partially crushing them and knocking them off the stems. I then discarded the stems and used a broom to get the accumulated leaves into a pile. This system was imperfect, however, because later in the sukumo process I found a notable number of stems while turning the pile that I had to pick out as I noticed them.
The pile of indigo leaves was watered to start the fermentation process. I had intended to start this step in the first week of October, but after the harvest and drying delays, my indigo leaf pile was not fully assembled and dampened until the first week of November, a full month behind schedule. I used rain water collected from rain barrels at my home to dampen the dried indigo leaves. I used a ladle and a pot of water to toss the water across the leaves. While I was fully prepared to switch to a modern hand pump sprayer, I found I actually had better than expected control over the amount and dispersion of the water when using the ladle. I did find that I needed to dampen the top layer of leaves, partially turn the pile, then repeat to get reasonable even distribution of moisture through the pile. This was not a technique I found mentioned in any text I have read, but as I tried different things, that was the most effective approach I found.
I covered my dampened indigo leaves with a layer of oak leaves and a canvas tarp. While many options show up in writings about techniques for making sukumo, these two were the most readily available to me. In my best understanding of the point of this cover, it should serve as a moisture barrier, reduce or eliminate airflow, and provide some insulation. While I doubt either the tarp or the oak leaves would have served this purpose on their own, layer the oak leaves over the indigo pile, then covering the oak leaves with the tarp was highly effective, but it also created a great deal of additional work each time the pile needed to be checked, and even more work every time the pile had to be turned. The tarp was not an issue, but the oak leaves had to be carefully picked off each time the pile needed to be uncovered, then meticulously reapplied before the tarp was replaced.
The pile maintained its moisture well once I was able to get it set up. It also warmed up quickly. By the end of the first week the tarp was warm to the touch and a few wisps of steam were visible when I pulled the tarp back. The indigo leaves were already developing visible clumps at this stage, however, so I opted to remove the cover and do a first turn of the pile at that time. When I began to move the pile, I noticed it was also leaving a stain on the floor under the pile, so I also opted to move the pile onto a modern blue tarp for the rest of the fermentation process to protect the floor. I moved the entire pile by hand, sorting through and picking out missed stems, as well as carefully pulling apart clumps as I went. This was another time consuming task that really had no shortcut other than to sit down and pay attention to the details until it was done. This pile, which was very small compared to those of traditional sukumo makers in Tokushima, took an entire day to sort through.
The first time sorting through and turning the pile was thankfully the most labor intensive. Each subsequent turn needed less maintenance and was manageable in far less time. I ended up doing at least a minor turning of the pile once per week for the first two months. At the 3 week mark the pile was developing a distinct ammonia scent, but also finally needed additional water. At that point I discovered that by composting the leaves on a tarp, I could use the tarp itself to roll the pile and turn the contents much faster and more easily, though I had to stop every few rolls to pick apart any clumps that rose to the top. This was still a huge improvement in reducing the workload and improving the consistency of the pile. After this addition of water, I continued to turn the pile weekly, but I did not need to add water again until the third month.
After two months, white mold was visible in small amounts throughout the pile. The ammonia smell became intense and clumps began to form more often. After three months, nothing seemed to be changing, but the color transfer when testing the sukumo by smearing it on paper was not yet showing signs of maturity. While several sources estimated sukumo fermentation as taking 100 days, others said 4 months. I discarded the oak leaves at this point due to their rapidly deteriorating state, and was unable to replace them at that point in the winter, but I otherwise continued to maintain the pile, testing the sukumo weekly.
In early March, more than 120 days after initially assembling the pile, the ammonia smell had largely dissipated. The sukumo still looked very similar to the two month mark, but the color it transferred when smeared on white paper was beginning to show a change from a blue green to a darker, near black, suggesting maturity. I had plans to go out of town for more than a week starting a few days after that change was noted, so I opted to turn the pile one final time, cover it, and hope it would be okay while I was gone.
Project Aizome Process
The real test for my sukumo was to build a vat and see if it would reduce. I started two vats, one larger using a 5 gallon plastic bucket that would give me some space to dye larger pieces of fabric if successful, and one in a smaller pottery vessel that was intended to be a closer approximation of the materials that would have been used in the 16th century as this technique rose to prominence. I used the specific measurements provided by the Buaisou workshop to establish a ratio that I could use to estimate the amounts needed for different sizes of vats. For the wood ash solution this was 1 kilo of wood ash to every 2 gallons of water. The vat itself needed 3 gallons of the diluted wood ash solution for every kilo of sukumo.
Using those numbers, I made wood ash solution 4 gallons at a time by pouring 1 gallon of boiling water at a time over 2 kilos of wood ash, stirring between each addition. After adding all 4 gallons, the mixture was allowed to sit overnight, then ladled off into a second bucket. I also added another 4 gallons of boiling water to the wood ash sediment to create a second batch. Japanese oak ash was noted as the specific type of wood ash used in Buaisou’s Tokushima dye house. I was not able to access Japanese oak, but I had access to white oak and used that instead. I had planned to use the second batch to adjust the pH, but when I tested the pH of my first batch it came out to 11.6. With that being the case, I opted to dilute the first batch without adjustment.
I cleaned both vat vessels then applied shell lime to the insides. The smaller pottery vessel has a roughly 1 gallon capacity, so I added 333 grams of sukumo. In the 5 gallon bucket, I added 1666 grams of sukumo. Ultimately, this turned out to be more than I likely needed because in both cases I forgot to account for the fact that the vats should only be half filled initially. I slowly added wood ash solution to the sukumo in each and stirred to mix until the sukumo was well dampened. After dampening the sukumo, I added enough diluted wood ash water to halfway fill each vessel. I did this one vat at a time, finishing one and washing both my hands and my spoon between vats.
To provide some nutrition for the vat, I opted not to use wheat bran, but instead used rice bran which, along with sake, are also frequently mentioned as additives to aizome vats. I opted to deviate from the method taught by the Buaisou workshop because rice products would have been much more readily available in the early days of sukumo development in Japan. I did use the proportions suggested for wheat bran, however, as other texts I found discussing vat building were very vague in how the ingredients were used. For both vats, I used 40 grams of rice bran mixed with 13 tablespoons of wood ash solution, then cooked on low heat in a stainless steel pan until color change. With the rice bran, a change in color was visible after just over 1 minute. I divided the prepared bran into roughly sixths by eye to avoid moving the hot, alkaline mix through multiple containers for measurement. I dropped one of these sixths onto the top of the smaller vat, and spooned the rest onto the top of the 5 gallon bucket vat. I then covered both vats and left them to begin fermentation.
I did not start the vats during the ideal time of year for using the ambient temperature to warm them, but I was able to approximate summer conditions by placing both vats in a greenhouse that had naturual fluctuations in temperature throughout the day and night, but more closely resembled the temperate highs and lows seen in Tokushima during the summer months. They were both stirred twice daily, as well as tested for color and pH checked each morning. I took daily notes3 which were originally intended to function as a troubleshooting tool to figure out what happened if the vats failed, but ended up having an unexpected benefit of functioning as a checklist that helped me remember to do each step.
My results deviated notably from what I expected from both assorted written sources and the Buaisou workshop information, because I had a fairly deep blue color showing up on my color tests starting from day six. I continued to test until day 10, but the day 6 depth of color stabilized and remained after it appeared.
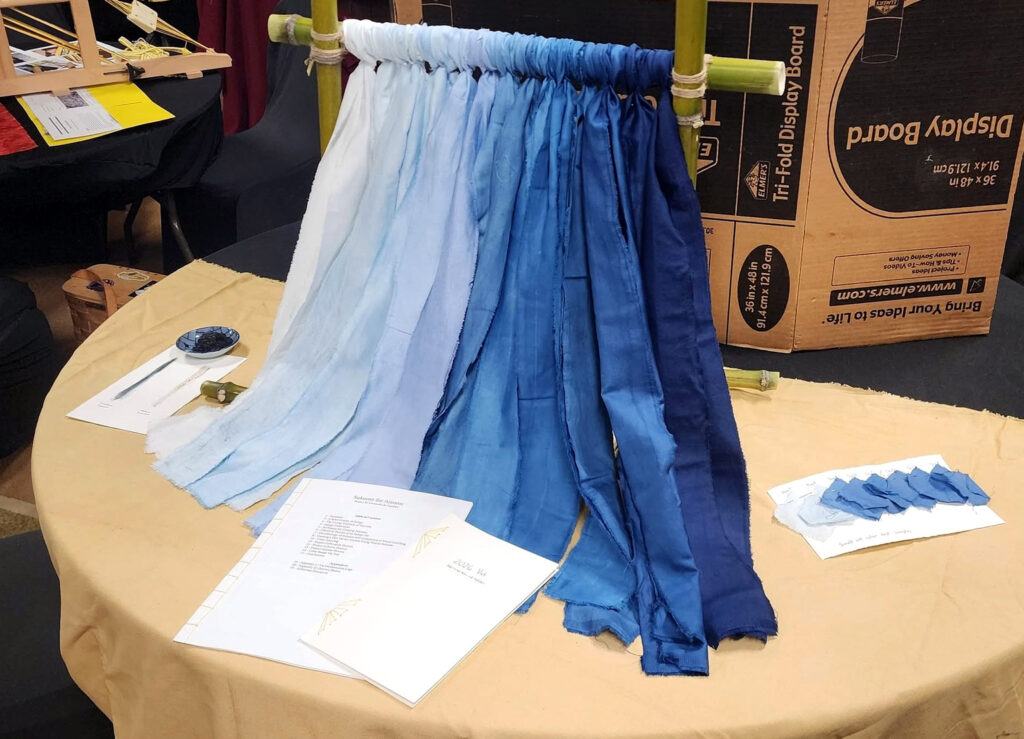
Color Range Vat Test
Many distinct shades of blue have names in Japanese. These include kachi, a dark blue favored by samurai in the Muromachi period and beyond due to being a homonym with the word for victory. Aijiro is a blue so pale it is near white. Nokon is the darkest shade, a navy blue that can appear nearly black. There are at least 22 of these indigo shade specific terms, including ai, which simply means “indigo” and is used as a color term to describe a slightly darker than mid tone, fairly saturated blue that is characteristic of indigo dyeing, but far from the only color achievable with it. This range of color terms refers only to blue shades derived from indigo dyeing. While other colors can technically be derived from indigoid plants, they are not washfast or lightfast in the way that indigo blue is. Aizome focuses on these blue tones. As such, I chose to test my sukumo and the vats I built with them by dyeing strips of cotton fabric with the goal of creating a range of blue shades.
I created different shades of blue by layering dips in the vat. The paler blues were difficult, because I found I had a darker than expected baseline blue from the first dip. I strongly suspect a much lighter blue is achievable as the indigo in the vat starts to be exhausted, as I have gotten much lighter blues that way using other indigo vat techniques. At this point, however, I have dyed a fair bit of fiber in both vats without any notable lightening of the blue imparted per dip.
Conclusions
Above all else, I am ecstatic with my results in this project. After previously only managing to create indigo leaf sludge, or garden compost that yielded no dye, I could not be more thrilled to have successfully worked through the process and not only produced usable sukumo, but used that sukumo to build aizome vats that are producing rich blues. The process in incredibly labor intensive, time consuming, and complicated. At the time of the first dip of a textile into one of these vats, I had been working on this particular attempt at making and using sukumo for just over a year, which was in addition to three previous failed attempts in previous years, and multiple years of fine tuning the seed stock for my Persicaria tinctoria plants.
My main takeaway from having successfully produced the sukumo is that this is absolutely not a job for one person. Modern sukumo production utilizes a mixture of traditional handcrafting and technological innovations. Mechanical harvesters and machines made to separate the leaves from stems work alongside humans with brooms, rakes, and skilled hands. I am left to conclude, between the modern use of technology and my experiences in this project, that the early sukumo makers must have utilized a much larger workforce. In attempting to do this mostly alone with a minimum of modern tools I found parts of the season very manageable, but at the peak of the workload there simply were not enough hours in the day for one person even while aiming to harvest and process an amount of indigo leaf that was a fraction of commercial production amounts.
After achieving a successful fermentation, I am also now fairly confident that my previous failures primarily failed because I was attempting to ferment too little indigo leaf at one time. While further experimentation would be needed to figure out what amount is truly the minimum, approximately 60 pounds failed to warm and retained too much moisture, while 112 pounds worked using the same process. Past experiences with failed piles were incredibly helpful, however, because it left me familiar with the smell, textures, and visual appearance of a pile that is starting to shift in towards failure and needs immediate intervention.
I am also in awe of the traditional craftsmen who can assess details as specific as minor shifts in pH by observing nuances in the process. While hydration, temperature, and scent of the sukumo pile became very noticeable to me over the course of my time spent tending the pile, the vat was an entirely different experience. There were gradual changes in the appearance and scent, but when my pH meter showed a change my present level of experience did not register any ways that the change was perceptible in the vat.
The use of different vat vessels was an interesting variable to explore. Ultimately I did not find any notable difference is using the ceramic vessel as opposed to the plastic when fermenting the vat using ambient temperature. If I had needed to add supplemental heat, however, the pottery vessel would have afforded me options that a modern plastic bucket simply does not.
1Promotion Council for “Ai no Furusato Awa (Awa-the home of Ai)”. Searching for the Supreme Blue of Japanese indigo; Japan Heritage: Tokushima prefecture, Japan, 2019.
2Source: NOAA climate record database
3See appendix I for daily vat maintenance logs.